Thursday, April 18, 2013

Turkish for lunch


Blog lesson numero uno: always triple check your spelling. Apologies for the thousands of typos, I'll try and up my game! Also apologies for the lack of cooking and therefore posts. Between organising a trip to Europe, applying for graduate jobs, working full time, playing sports and seeing friends and family, I have such little time to do anything blog related. Worst. Finally, apologies for the super crap photos! I don't know what went wrong this time!

A couple of weekends ago we made lamb pides with beetroot dip for Saturday lunch. It was rather yummy! This recipe served two lovely and happy ladies and two hungry and smelly boys!

Ingredients
Olive oil
500g lamb mince
3 shallots, thinly sliced
3 garlic cloves, crushed
1 tablespoon of tomato paste
2 lemons (one to serve and the other for below)
       1 teaspoon of finely grated lemon rind
       1 teaspoon of fresh lemon juice
3 teaspoons ground cumin
2 teaspoons ground coriander
2 tablespoons chopped fresh mint
1 x 225g can sliced beetroot, drained
130g (1/2 cup) natural yoghurt
4 Turkish bread rolls


1. Preheat your oven to 180°C. Heat oil in a pot/pan on medium heat and cook the lamb mince for approximately 3 minutes. I lovvvvee lamb mince.

2. Add the shallot, garlic, tomato paste, lemon rind, lemon juice, cumin and coriander to the mince. Cook, stirring, for 3-4 minutes or until mince is cooked through. Then stir in the mint and set aside to cool slightly.


3. Place the beetroot, yoghurt, some cumin and coriander in a food processor and blend until it's smooth. It turned out pretty runny though...any suggestions to make it thicker? It was still super delish though! (sorry we forgot to take pictures!!)

4. Cut an oval piece from the top of each bread roll to make a shell. Place bread shells on a large baking tray and fill it with the mince.


5. Bake for about 5 minutes and then slice it all up to serve with the beetroot dip and lemon wedges :) It was so yummy! The only problem was the mince kept falling off...maybe if we added a bit of cheese to hold it together it could have worked a bit better! Until next time...


Thursday, April 11, 2013

Munch time: For the love of scones


"To master a piece on the piano, learn how to order a glass of wine in Italian, plant a herb garden or make a book case are not world-transforming achievements, in the big romantic sense. But they allow us to be active agents of beauty, grace and order." 


I read this quote the other day in an article about creativity and happiness and it really struck a cord inside. The reason why I made this blog is because it's one of my only creative outlets since finishing uni. I don't care if no one reads it, being creative is FUN and it makes me happy :) So there you go. 

Other things that make me happy include easy recipes and yummy food. These lemonade scones fit both of these criteria so happiness prevails! (Shout out to the lovely Carly for offering her kitchen) 

Would you like to know how to make scones? Well here you are: 

Ingredients 

Lemonade 
Self-raising flour 
Thickened cream 


That's it! Easy! I would give you measurements but in reality, you just guess. I followed a recipe on a website and the dough was too dry so I had to add more cream and lemonade. Just go for it, be creative!! 

How to make 

1. Preheat the oven at 225 degrees. Pour flour into a bowl (easy enough) 


2. Mix lemonade and cream together (still relative easy) 


3. Pour lemonade and cream into flour and mix together. Don't mix it too much though, just until it's all combined. It should be sticky and soft.


4. Lightly flour the bench and roll out the dough to about 3.5cm thick. 


5. Cut the dough into the desired scone shapes and place on a tray. SO I know scones are meant to be round but we didn't have a round cookie cutter. We just used a knife and cut them into squares/squircles.
TIP: Later that night, mum told me that she uses the top of a wine glass! So there you go. She's a thinker. 


6. Bake in the oven for 12-15 minutes at 225 degrees. 


7. Whip up the cream while you wait, open the jam, let the scones cool and then EAT as many as you want!!! They are delicious. 


FUN FACT: I eat my scones like a sandwich. Yes that is probably a bit odd but I guess that's the way I like it! How do you eat yours?


Saturday, March 23, 2013

The healthy chef's Banana Bread

Hello Everyone :) I know this blog is a bit slow and I apologise to all my dedicated fans that follow this. By dedicated fans I mean two fans, and by two fans I mean two friends - Emily and Carly. Check out their blogs. Much more productive than mine.

Anyways, today I attempted to cook a gluten free, healthy banana bread. Usually healthy and banana bread go together, but I think I can safely say that this version is much better alternative than your regular cafe version. 

This is a Teresa Cutter recipe from her website thehealthychef.com. This website was reccommended to me by a fabulous friend named Lotte and I really do like some of her recipes.

Looking at the recipe, I was a little worried that it wouldn't turn out. Me and new ingredients don't work well together. Also, almond meal (which Teresa often uses in her recipes) is pretty expensive so I probably won't be making this all the time... I'll have to find somewhere that sells it in bulk.
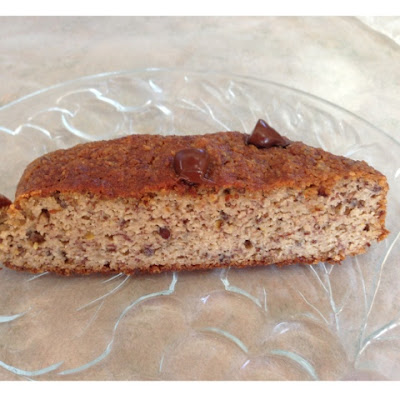
Here we go:


300 g mashed ripe banana (I used about 2 bananas)

3 eggs

2 tablespoons honey 
1 teaspoon vanilla essence
1/4 cup olive oil
1/2 teaspoon of ground cinnamon (I love cinnamon so I added more)
1/2  teaspoon of baking soda + 1 tablespoon lemon juice
2 cups of almond meal
1/4 cup of ground flax seed (linseed)


1. Turn the oven to 160 degrees - don't forget - I always forget. 
Mash the banana. Then combine with the honey, oil, cinnamon, vanilla essence, bicarb soda and lemon.


2. I forgot to add the eggs. Please do add the eggs in step 1!


3. Add the almond meal and the flax seed. Mix it well.


4. Pour the batter into a rectangle baking tin and bake for about 45mins - 1 hour...or until the skewer is clean!

I added some dark chocolate choc chips on top just to spice things up a bit.


5. ENJOY! So yummmmmmmmmmmmmmmmmyyyyyyyyyyyyyyyyyyyyyyyyyy


Wednesday, March 13, 2013

Health check - Tandoori chicken

I'm leaving for Europe in 79 days. To prepare for my overindulence in various European foods, I decided it's time to learn some healthy meals for my pre-travel detox.

My wonderful friend Kristina has been doing some clean eating and sent me one of her healthy recipes. I cannot explain how EASY and DELICIOUS this recipe was. I probably use the words 'easy' and 'delicious' way too much. But seriously, it was. I was actually impressed with myself with how good it tasted and surprised how healthy it was!

So here it goes...(this serves about 2 people)


1 medium onion

200g chicken breast (cut into small pieces)
1 tablespoon tandoori paste
200g cans canned tomatoes (I used crushed tomatos - whatever you want really) 
1/4 cup liquid vegetable stock
80g canned lentils, drained
1/4 cup light cream


1) Chop up the onion and the chicken.
I hate chopping up onion. I wore my sunglasses the whole time...doesn't really work that well....for a few tips to stop the onion cry and a bit of info about this pesky veggie, I look to Dr Karl - he's the man.


2) Heat a non-stick frying pan over medium-low heat. Add the onion and cook until soft - stirring often (about 5 mins). Increase the heat to medium-high and add the chicken (cook for for 3-4 mins).


3) Add the curry paste. Cook, stirring, for 1 minute or until fragrant. Next, add the tomatoes, stock and lentils and bring to the boil. Reduce heat and simmer, stirring occasionally, for 30 minutes or until the lentils are soft and the sauce thickens. 

If after about 25 minutes the sauce isnt the thickness you want, add a teaspoon of cornflour - works a treat. However, once the sauce has sat off the heat, it does continue to thicken. 


4) After 30 minutes, stir in the cream and cook for 1 minute or until heated through.


5) Let it cool and enjoy with rice, papadums, whatever you want really! I had a bit by itself with a teaspoon of Natural Greek Yoghurt - Delish.

I've had this for lunch 3 days in a row.....


Sunday, March 3, 2013

Munch Time: Mars Bar Slice


Definition
Munch time: [muhnch tahym] noun : A phrase made up by my good friend Brendan. Also the name of a new group of blog posts detailing easy treats to take to parties, bbqs etc etc.

This is the first of (hopefully) many munch time posts. So on the weekend I had a Greek BBQ which involved many a souvlaki. A family friend insisted I make mars bar slice and with great pleasure I agreed.

I'm going to be honest, mars bar slice isn't healthy nor can you stop at one piece. HOWEVER, it is absolutely delicious and so amazingly easy that even I can't fail it.

This is the original recipe and doesn't make as much as the pictures show (I roughly doubled the recipe)


Mars Bar Slice
Approx 220 gm of Mars Bars
80 g butter (50gm to melt with the mars bars, 30 gm for the chocolate)
Approx 3 cups of rice bubbles (feel free to add more, just see how you go with the amount of mars bar mixture you have)
200g milk cooking chocolate


Firstly, roughly chop the mars bars. 


Then place it in a pot (on low) with the butter and stir until you get a smooth mixture.


Mix the melted mars bar mixture with the rice bubbles and then flatten it out in a square baking tin.
Let it set in the fridge for about 10-15 minutes.


Melt the chocolate and butter in a pot and once smooth, spread over the rice bubbles.


Let it set in the fridge again and then cut whatever size slices to serve.


Eat and don't feel guilty about a thing. Mmmmmmmmmmmmmmmmmmmmmm